Bow Slide
By Wayne Horodowich
The are many different ways to drain water from a kayak. The original methods of modern kayaking had the flooded kayak kept in the inverted position during the draining process until the cockpit was empty. Then the kayak was turned upright so the paddler in the water could enter their kayak again.
I think it is important to understand the reasons why certain techniques were developed. If you know the rationale behind the steps of a technique you can make an informed decision if you want to change any of the steps in that technique. Just performing techniques without the history of the technique could have you performing useless steps.
Here is a great story that illustrates this idea. On Christmas Morning the husband asks his wife why she just cut the tip of the roast off before putting it into the roasting pan. She said she learned it from her mom, but never asked her why. The husband being a curious sort called his mother-in-law and asked her. She told the husband she had learned it from her mom, but didn't know why. The same answer came from the grandmother. Fortunately the great grandmother was still alive and still cooking. When the husband called her and asked, she paused on the phone and then said, "When I was younger I only had one size roasting pan. The roasts we got were usually larger than the pan so I would cut off the tip so there wouldn't be any juices falling off into the oven. I guess my daughter used to see me do it and never asked why."
In modern day kayaking the basic recovery techniques were developed when there were no bulkheads in the kayaks. When a paddler would wet exit, the overturned kayak was kept that way for a good reason. If you kept the kayak upside down, then the air would stay in the kayak so it would not sink. The air trapped in an overturned kayak provided floatation. If you turned the kayak upright there was a possibility of loosing the kayak due to the air in the kayak escaping as the kayak was rolled upright. The speed at which one rolled a kayak upright determined the amount of additional water that was scooped in the righting process. If there was not enough air still trapped in the flooded kayak, the weight of the kayak and it's contents would send the kayak to King Neptune's Used Kayak Lot.
As technology advanced it made it possible to get reliable hatch covers, which allowed boat manufacturers to install bulkheads. Bulkheads could have been installed years earlier, but without reliable hatch covers you couldn't have a bulkhead. Imagine having a small leak into the forward or aft chambers and not having a way to get the water out. Water tight hatch covers allowed bulkheads.
Now the norm is that sea touring kayaks have forward and aft compartments with water tight bulkheads and hatch covers. In fact, many models now have three water tight compartments if you count the day hatch. These water tight compartments are also air tight chambers which provide floatation to the kayak when the cockpit is full of water. That means that a kayak will not sink if you flip it upright after you wet exit, regardless of water in the cockpit. Now that we have adequate floatation as a result of bulkheads, let's look at the Bow Slide.
Now that you know the history, we will set the stage with a quick review of a traditional recovery and the way water is emptied from a flooded kayak. When the swimmer jumps on the stern it helps lift the bow of the flooded kayak so the assisting paddler can pull it across their boat. Once the bow of the flooded kayak is in the hands of the assisting boater, that boater will drag the kayak across their kayak and drain the water from the cockpit of the flooded kayak. See USK article, "TX-Recovery."
If you have ever tried dragging an inverted kayak across your lap you know that it can be difficult, especially if there is anything on the deck of the inverted kayak. Just the process of breaking the suction seal (with the cockpit and the water) is a challenge when the kayak is upside down in the water. These difficulties are some of the reasons why the bow slide was developed.
As a side note, it is interesting to mention that even after bulkheads were installed in kayaks many instructors still taught the original techniques, even though certain steps no longer made sense. The TX drain was still being used until some common sense paddlers realized that just using a T-drain would serve the purpose if there was a rear bulkhead. See USK article, "T-Recovery."
The bow slide is so named because you take advantage of the sweep of the bow when you need to drag one kayak over another. Nowadays, when a paddler wet exits their kayak they no longer need to leave their kayak upside down in the water to maintain the kayaks floatation. Remember, kayaks without floatation or bulkheads could sink when air escapes when the kayak is turned right side up. If you have two bulkheads or sufficient air bags or a sea sock, you no longer have the concern of you kayak sinking when it is turned upright when the kayak is still in the water.
On a side note, I still leave my kayak upside down until I know what I plan to do as a recovery. One of my favorite little tricks is to keep one of my legs in the cockpit of the inverted kayak as a means of maintaining contact with the kayak, which gives me two hands free to do whatever I need to do. The only exception to this is in surf and very fast moving water. In both cases I hold my kayak, but position myself to not get hit by the kayak when the water acts on the boat.
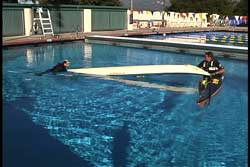
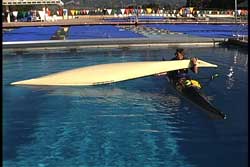
In this first illustration the assisting kayaker is setting up in a T-position to begin the draining process. As you can see, the kayak is already upright. Turning the kayak upright can be done in a number of ways. There will be a future article on the different ways of flipping a kayak upright. For the time being let's just say the paddler in the water flipped it upright when the assisting boater arrived on the scene and they decided to use the bow slide.
Once in the T-position the assisting paddler grabs the bow handle with the outside hand and a deck line with the inside hand. Using two hands allows the assisting boater to get a good pull so the flooded kayak slides up across their cockpit. The contour of the bow and the smooth surface of the hull makes it much easier for the kayak to slide over the spray skirt as compared to an inverted kayak trying to slide across your spray skirt.
When you try this technique you will notice that deck lines give the assisting paddler something to grab along the length of the kayak as they try to slide the kayak onto their deck. If you do not have deck lines the person that is being disadvantaged is you. I have seen first hand recoveries in rough water training sessions where assisting boaters could NOT get a good grip on the flooded kayak due to an absence of deck lines. After three different boaters failed in their attempts, I finally jumped in to empty the flooded kayak. Even though I emptied the kayak it was very difficult for me to do it without the deck lines. The paddler in the water was dressed for immersion so we had time. By the time I got the paddler back in their kayak it was about a 15 minute immersion time, which is ridiculous for an assisted recovery. If I had not been there I am not sure what the other kayakers would have done since they were not successful in trying to drain the flooded kayak. It is important to mention the flooded kayak did not have a front bulk head, but it did have a large float bag in the front area. With respect to having deck lines the message is very clear, the life you save will be your own. In addition, you put your fellow boats at risk when they have to save you and your kayak doesn't have deck lines.
As the kayak slides up onto your coaming it will naturally want to lean to one side due to the ridge of the keel. I suggest you insure that it tilts so you can see the cockpit of the flooded kayak as you sit in your cockpit. You can use the deck lines to help you tilt the kayak that way.
The reason you want to see the cockpit is for draining purposes. Not only can you see the water draining, you will have the kayak in a more user friendly position to grab the bow area when you lift the kayak. Remember, you want to lift the bow to get more of the water out.
It is worth mentioning that some boats on the market will be sufficiently drained just by dragging the bow up on your kayak and tilting it to the side. The remaining water will not be enough to affect stability after the paddler is back in their kayak. You will not know if your kayak is in this category until you have tried this with your paddling partner.
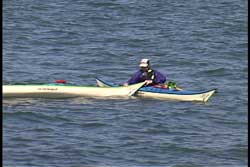
There are many ways you can grab the bow when you decide to lift the kayak for draining. A method I have found to be very useful and stable is wrapping my outside arm under and then up over the keel. As you can see I have a good grip on the keel while the deck rests in the crook of my elbow. This is dependent upon the design of the flooded kayak and your arm size. The shorter your arms, the closer you need to grab to the bow.
In this example I have my other hand under the kayak helping with the lift. That second hand is also holding a deck line.
I first got into this position when the kayak was on its side. As I reached under the bow I grabbed the keel. Then I rolled the kayak towards me onto my chest. I can even lean back to help lift the kayak with my body instead of using arms only.
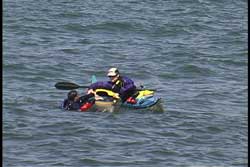
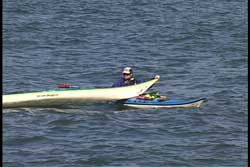
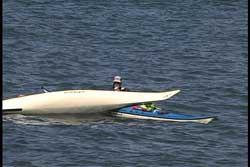
After you have drained the cockpit sufficiently, you can right the kayak trying to avoid scooping any additional water. Then slide the kayak back into the water and move the boats into your stabilizing position of choice that will allow the paddler in the water to re-enter their cockpit.
In this example the kayakers are using my recommended position, which is a bow to stern configuration. I feel this position keeps the assisting paddler out of the way of the cockpit and also provides them with more option if they need to assist the paddler in the water. This position also allows the assisting boater to keep their eyes on the other paddler during the re-entry process. The will end up facing each other when the second boater is in their cockpit. See USK article, "Walking A Kayak" for more information about moving kayaks into desired configurations.
I have to say that I have found the bow slide a much easier way of getting a kayak up across my deck as compared to dragging an inverted kayak across my lap. This method has become a staple in my beginning classes. There are some kayak designs that have more of a blunt nose on the bow, but they still have a slight curve on the bottom of the bow to make this technique still viable.
Regardless of the bow shape, it is still easier to pull an upright kayak across your cockpit than an inverted one. Part of the reason is the seal made by the water and the inverted kayak. Breaking that seal takes effort. In addition the assisting paddler needs to be stable when breaking that seal if they wish to prevent their own capsize.
As with any new technique, try it with your partners in calm water and then in rough water before you need it in a real situation.
Pictures seen above were taken from the USK Video "Capsize Recoveries & Rescue Procedures"
© Copyright USK