Capsize & T-Recovery Combo
By Wayne Horodowich
During my years of teaching sea kayaking I have seen numerous dual capsizes when a T-Recovery was being attempted. Most of them were during basic classes when the students were first learning capsize recovery techniques. It is understandable, because a novice’s stability is still in the experimental stage. The capsize usually occurs when lifting the bow to drain the water.
The second circumstance where I have seen this same scenario occur was in very rough conditions. This is also understandable, because most paddlers don't practice their techniques in rough conditions. Grabbing and holding on to the bow in rough conditions can be difficult. In all of the dual capsize cases I have seen the second one capsizing performs a wet exit. It is not common for that paddler to stay in their kayak. Now there are two in the water that need to do solo recoveries or be helped or the two (if they are alone) need to perform an all in rescue. (See USK article "All In Recovery".) For a variation of the "All In Recovery" See USK Article "Dual Wet Re-Entry & Eskimo Recoveries". Immersion time increases due to the second capsize and wet exit.This is assuming that the assisting paddler cannot roll or their roll fails.
If your goal is to minimize immersion time, then you may wish to consider practicing a combination of two techniques. Try combining swimming with your kayak (See USK Article "Swim with a kayak) and then add a T-Recovery (See USK Article "T-Recovery). Once perfected, there should be no need to wet exit if you were to capsize while performing an assisted capsize recovery technique, because another kayak is right near by.
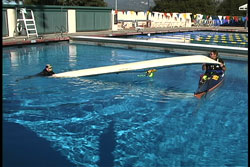
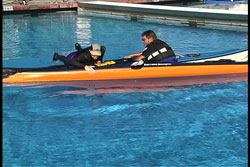
Here I am helping to drain the water from my partner's kayak after they capsized. Let's imagine I loose my grip and balance while in this position and I end up capsizing. First thing to do is to protect your head from banging into the kayak you just dropped. When practicing this skill fall toward the kayak you are draining while keeping your hand on the bow so you can keep your head clear of it.
Now you are upside down with your goal being to get the other kayak back into your grips so you can recover yourself without wet exiting. When you are back upright you would reinitiate the T-Recovery.
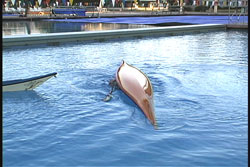
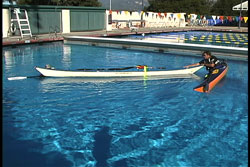
Swimming while in your kayak is a great skill to have in your bag of tricks. While upside down turn toward the side where you see your partner's kayak. You have a choice of side stroking to your partner's kayak or doing a dog paddle. If you dog paddle, rotate your torso so your chest is facing the bottom and your back is toward the surface. Hopefully you had your paddle secured under a deck line or attached to a paddle leash before you started draining your partner’s kayak.
Swim towards the other kayak. If you need air along the way you can push down with both hands to provide lift so you can get a breath of air before you continue swimming. When this type of dual capsize occurs the other kayak is usually near by. On windy days the other kayak can quickly move away so you need to start your swim immediately. If it is real windy, you will not be able to catch the other kayak and then a wet exit would be your next option if you couldn’t roll. It is important to keep yourself braced into your cockpit when swimming with your kayak. It is easy to slip out if you do not brace yourself in with your knees and thighs while pressing on the foot pedals.
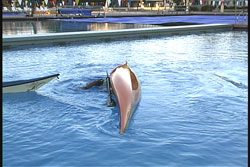
The most difficult part of this skill is finding the other kayak when you are underwater. We easily get turned around when we capsize. If the kayak started on my right side before I capsized I need to be coming up with my left arm leading. That is why I like to practice this skill by falling toward the kayak as I drop it. Eventually you should practice falling away from the kayak you are draining so you can practice orienting yourself.
As in all planned submersion practice sessions, I recommend you use nose clips and/or a dive mask. If the water is very cold use a hood. Once you learn how to find the other kayak then take off the mask. Then keep practicing with nose plugs. Eventually you will want to try it, as it will normally occur: free from nose clips. It is always good to be as comfortable as possible when you are first learning the skills. Once you have the orchestration of the skill mastered in controlled and comfortable conditions, then start simulating real life conditions.
Once I get to the bow (or any other part of my partners kayak) I lift my head to my hands (which are now out of the water) and I take a few breaths. Then I right myself by righting my kayak underneath me. I bring my head up last to reduce strains. I am simulating the same action we use in bracing and rolling when I right my kayak.
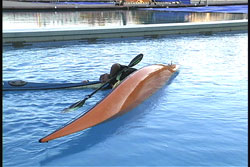
Now that I am upright, I can continue with draining the water from my partner's kayak. Most likely the cockpit refilled when I capsized and as it dropped back into the water.
I have often seen the rescuer capsize as a result of being tentative when holding their partner's kayak. If you grab the kayak and commit yourself to holding it, it is difficult to fall over. If your partner's kayak has deck lines you have an advantage. If they do not have deck lines you may suggest that they put them on so you can better assist them.
I find once I grab a kayak I will not fall over. I look at another kayak as an island of stability. I enjoy putting my full weight on the other kayak as I get it into my grip. It is important to know the internal floatation of all the boats your paddling partners have. I typically inspect kayaks on the shore before the group takes off so I know what I may be dealing with on the water. If I don't like what is there I can choose not to go or try to encourage the individual to add floatation if possible.
Once the water has drained out of the cockpit I can right the kayak so I can get my partner out of the water and back into their kayak.
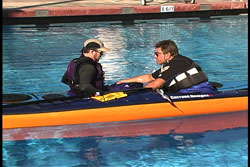
From the bow, I spin my kayak so I go into the bow to stern position (See USK Article "Walking a kayak"). I prefer the bow to stern orientation, because I feel I have more options for helping my partner if they are having difficulty getting back in. I also like facing them so I can see how they are doing with respect to facial expressions. It is also easier to hear when I face their mouth.
 When I get to the cockpit I take my partner's paddle so they have their hands free to climb over the back deck and re-enter their cockpit. That bow to stern orientation leaves their cockpit wide open if I stabilize from the front of their cockpit. (See USK
Article "Stabilizing at the cockpit")
When I get to the cockpit I take my partner's paddle so they have their hands free to climb over the back deck and re-enter their cockpit. That bow to stern orientation leaves their cockpit wide open if I stabilize from the front of their cockpit. (See USK
Article "Stabilizing at the cockpit")
Once my partner is back in their kayak I help as needed until they are ready to go. Remember to take some time to get seaworthy (See USK Article "Seaworthy"). Since you both capsized, a little rest break is a good idea. You can rest on each other’s kayak for stability.
As always, don't let go of your partner's kayak until they tell you to do so. If you assume they are ready you may have another capsize on your hands.
I normally offer this combo in my advanced skill classes. There has to be a comfort level with being upside down in order for this combo to be successful. I suggest you begin with the kayak swim. Once you feel confident with the kayak swim you can start using it in many different combo drills aside from the one mentioned above.
Again, our goal was to reduce immersion time for both paddlers. By staying in their kayak the rescuer reduces their immersion time. If the immersion time of the rescuer is reduced it automatically reduces the immersion time for the first person in the water. I feel this combo uses a lot less energy than any of the all-in-recovery variations.
Give it a try on your next capsize recovery practice session.
Pictures seen above were taken from the USK Video "Capsize Recoveries and Rescue Procedures "
© Copyright USK