Paddle Float Recovery
By Wayne Horodowich
The most efficient solo recovery after a capsize is a roll. However, sooner or later all of us end up having to do a wet exit. If you like to paddle alone or if the others in your group can not assist you, then having a reliable way of getting yourself back into your kayak and getting your craft seaworthy is a necessity if you want a long career in sea kayaking.
In my experience the most widely taught solo recovery (assuming a wet exit) is the paddle float recovery. A paddler needs a reliable way of stabilizing their kayak if they are alone and they are climbing onto the deck, since the kayak wants to roll over as you climb on. It is even more unstable if your kayak contains water in the cockpit or the bow and stern areas if you do not have bulkheads or a sea sock. We have learned from Polynesian canoes that the use of an outrigger is a method of providing support to a watercraft. By using a float at the end of a paddle and using the paddle as the outrigger the unstable kayak now has some stability. (See USK article, "Floatation Devices For Capsize Recoveries".)
There are many variations of the paddle float recovery depending on the type of float you use, available deck rigging, your size in relation to the kayak and your ability to climb onto the deck of your kayak. I will show a more versatile method of the paddle float recovery and then discuss some of the popular variations and options.
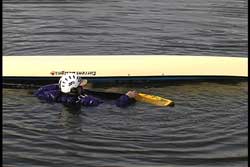
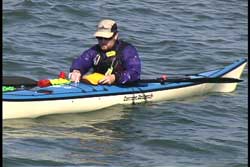
Once you find yourself in the water and you have decided to do a paddle float recovery you need to get your float out from where it is stored. Where to store recovery equipment is a topic unto itself. See USK article, "Deck Storage." In order to have hands free operation to perform this skill, one suggestion is to leave your kayak upside down and put one foot into the cockpit while lying back on your PFD. The use of tethers is another alternative for hands free operation.
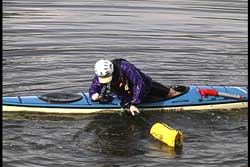
Put the float on the end of your paddle, secure it to the paddle so it doesn't slide off the blade and then inflate the float if it is an inflatable float. A foam float is ready to use once you secure it to the blade, which reduces your immersion time. Once you have inflated your float, flip the kayak upright. Keep in mind the faster you flip your kayak the less water the cockpit will scoop thus reducing pumping time.
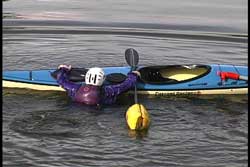
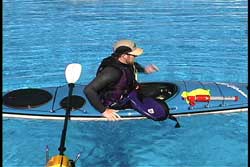
Create the outrigger by placing the paddle shaft directly behind the rear cockpit coaming. One hand can hold the coaming and the paddle shaft while the other hand is placed on the back deck while you ready yourself to climb onto the back deck.
In this example the paddler is on the stern side of the paddle shaft, because he needs to be able to have room to put his feet into the cockpit first. When ready, the kayaker kicks his or her feet out behind to get their feet near the surface. The paddler kicks their feet and pulls with their arms in a coordinated effort to get their body across the back deck.
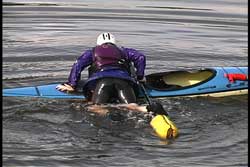
It is imperative the kayaker first get their body over the back deck before they put their foot onto the paddle shaft. Do not climb up on the paddle shaft first. There is an excellent chance of sinking the float and/or breaking the paddle shaft, especially if you have a light weight paddle. The kayak is used to support the majority of your weight and the outrigger is there to add stability.
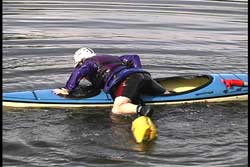
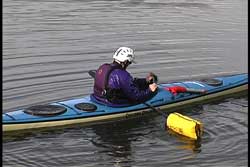
Once you are balanced on the back deck and one ankle is hooked over the paddle shaft you are ready to move into the kayak. The re-entry method we will demonstrate, with the paddle float, keeps the kayaker's center of gravity low to deck of the kayak, which is more beneficial in rough conditions. The lower one's center of gravity in the kayak the more stability one feels.
After watching many paddlers perform this technique I highly recommend a short rest break once you have gotten your body over the back deck and you have at least one foot on the paddle shaft. I recommend the break, because many paddlers are a little fatigued at this point and a rest could be of help. In addition, resting on the back deck helps the paddler get accustomed to balancing on the kayak again. Remember, you have just come out of the water where you not have to balance on your kayak. The paddlers that move too quickly regularly lean too far away from the paddle float and end up flipping over since the paddle float is only providing stability in one direction, if there is not a counter weight on the float.
When you are ready to continue you want to get your second foot onto the paddle shaft. After the second foot is on the shaft you can move the foot closest to the cockpit into the cockpit.
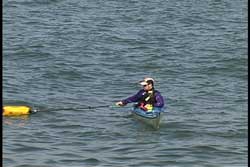
After the first foot is in the cockpit move the second foot into the cockpit. If you look at the pictures you can see that your body is pivoting on the back deck as you move your feet into the cockpit. Your body began perpendicular to the kayak and will finish parallel to the kayak when both feet are in the cockpit.
It is critical to have one hand on the paddle shaft when you remove your second foot from the paddle shaft. Reaching that hand out onto the middle of the paddle shaft helps keep your balance toward the paddle float.
As you slide your body into the cockpit rotate up looking toward your support, which is the paddle float. As you do so you will need to switch hands to keep control of the paddle shaft. During this entire operation you need to keep your balance point toward the float. If you lean away from the float you may capsize and then you will need to begin the re-entry process again.
This is a good time to mention paddle floats with a counterbalance attached. The common type of counterbalance is a bag that fills with water that is attached to the paddle float. This makes it more difficult to capsize when you lean away from the float. The weight of the water in the bag is the counterbalance. Most commercially sold paddle floats do not have a counterbalance.

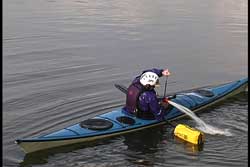
When you are finally seated properly in your cockpit your paddle shaft is still behind your seat. It is in your best interest to quickly move the paddle shaft in front of your body, because keeping your outrigger lying loose behind you is not very functional. It is also possible to lose your paddle if you do not maintain constant contact with it.
Having the outrigger in front of your body allows you the opportunity to use both hands to reattach your skirt and pump out the water from your cockpit and still monitor your paddle. If you were to lose your balance you can quickly grab your paddle for support if it is right in front of you rather than being behind your body.
As you will find out when trying this recovery method, you will have to maintain your balance in your kayak when you let go of your paddle shaft. If it is rough conditions your balance will be dependent upon keeping loose hips and watching the horizon rather than resting on your float, if you need two hands to reattach your spray skirt.
One trick I learned over the years is to tuck the paddle shaft under your belly, which can hold the paddle shaft in place thus providing some degree of balance while you reattach your skirt. Once the skirt is on the coaming you will need to get the water out of the cockpit.
There are many thoughts on pumping out the water from your kayak. If I am in a location where I can pump out the water and not be drifting into disaster I will take the time to pump. However, if I am in an undesirable location, such as in the middle of a rock garden or drifting toward a sea wall, I will probably paddle with my cockpit full of water to a more suitable location to pump out the water.
I have found the most stable position for pumping is making a small opening on the side of the cockpit nearest the paddle float so you can place the pump into the cockpit and pump out the water and not allow more water in, because the skirt is in place. The forearm closest to the float rests on the paddle shaft and that same hand holds the pump and the edge of the skirt. The other hand does the pumping. Lean to the float and the water will pool on the same side as the pump if you follow this method.
After the water is out of the cockpit getting the air out of the float and the float put away becomes your greatest challenge. This is when you are most vulnerable. Your external support is gone and you are in the conditions that capsized you in the first place.
My best advice is to move quickly while watching the horizon for better balance. A fast way of deflating the float utilizes water pressure. Open the valves and submerge the float. Keep the valves above the water. Once deflated remove the float and put it away where you can get it again if need be.
Since you are more stable when your kayak is moving as compared to sitting still, I recommend opening the valves of your paddle float and begin paddling forward. See USK article, "Paddling A Flooded Sea Kayak." The water pressure will deflate the float as you submerse the blade with the float on it. The forward momentum adds to your feeling of stability. Having a paddle float that allows water to drain rather than scoop water is an advantage. My favorite paddle float has mesh on the end so I am not lifting water as I lift the blade that has the float on it. You must make sure that your float is securely attached if you try paddling with the float on the blade, especially if the float scoops water. It can be difficult to be lifting this bag full of water.
If possible, I suggest you replace your paddle float in your normal storage location in the event of another capsize. This way you will know where to find your equipment rather than having to search for it. That is why I recommend storing your equipment in a location that is accessible when you are in the water and one that allows you to restore the equipment in the original location.
Access to your recovery equipment and restowing that equipment is an important topic. Can you get to it quickly? Can you restow it after use in rough conditions and not capsize? Can you get to it and use it when in your cockpit in rough conditions? See USK article, "Deck Storage."
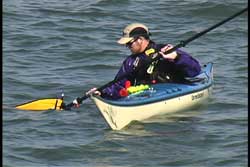
A main variation to the recovery method described above is using deck rigging if your kayak is so equipped. The primary advantage to using the rigging is hands free operation. Once the paddle is placed under the rigging you no longer need to hold it in place. Climbing onto the back deck and getting into your cockpit is a bit easier since you do not have to hold the outrigger in position.
You may have to adjust on which side of the paddle shaft you decide to climb onto the back deck, since the paddle shaft is farther from the cockpit if you use deck rigging. I am often asked, "On which side of the paddle shaft should I be when I climb on to the back deck of my kayak?" The answer is dependent upon your size, size of cockpit and if you hold the paddle shaft or use the rigging. Your goal is to be able to slip your feet into the cockpit. If you are too close to the cockpit you won't be able to get your feet in. If you are too far away you will have to slide along more deck than necessary. The general rule of thumb is: start on the stern side of the shaft if you hold the paddle shaft behind the coaming and begin on the bow side if you use the deck rigging. Again, practice with your equipment in calm conditions to see what works best for you.
You can add the necessary deck rigging yourself. I have found greater stability when using rigging as compared to holding the paddle shaft behind the coaming. The main reason I describe the hand held method first is because not all kayaks are rigged properly for holding the paddle in place for a paddle float recovery.
When you are finished pumping, your spray skirt is reattached and you are ready to paddle, it is time to take the outrigger out from under the deck rigging. Remember, you do not need to be in a rush to do so. If you need some time to gather yourself, then take the time you need since your outrigger is still supporting you. It is not only important to have your kayak seaworthy; you want to be mentally prepared to continue. See USK article, "Seaworthy."
Earlier I said I feel more stable when the outrigger is under deck rigging. While I feel that is true there can also an additional point of instability when you remove the paddle from the deck rigging. When the paddle is coming out of the rigging you will feel a balance shift. Don't lean out away from the boat as you slide the paddle out. Some deck rigging is designed to just pop open and instantly releasing your paddle. The sudden loss of support can be that weak point if you are not ready for it. Once the paddle is out from the rigging you will still need to deflate and restow the float as mentioned above.
As mentioned earlier, if you use a foam float there is no inflation time or deflation time. If you have the deck space and/or paddle in cold-water areas you may wish to consider a foam paddle float. No inflation time reduces immersion time.
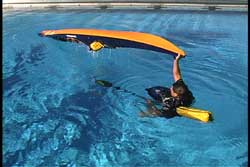
One skill that is equipment dependent and many times strength dependent is an in-water drain of your kayak before you do your re-entry. After the float is on the paddle and inflated, you can use the buoyancy of the float while treading water with your legs to help you lift the bow in order to drain water. The paddle is under the armpit with the float close behind you. Once the water is out you can let the kayak flip upright. There are many kayaks that don't respond to this method. Try it with your kayak in a practice session before you need it.
If you are properly dressed for immersion the extra time you take to try draining the water will not affect your body temperature. However, don't waste time if you are cold and/or improperly dressed. Your primary goal is to reduce your exposure time. The advantage of draining water prior to entry is reducing or eliminating pumping time.
As a side note, always check your rudder cables before you re-enter your kayak when you are alone. It is not uncommon to have a cable foul over the rudder saddle after a capsize. Once in your cockpit it is difficult or next too impossible to undue the cable. I practiced a number of times trying to use my paddle to undue the cable snag and laughed each time I capsized during my attempts. I was in flat water when I tried. Imagine being in rough conditions.
A stirrup can be used with a paddle float, but that is reviewed as a separate skill. See USK article, "Paddle Float Stirrup Recovery."
See USK article, "Re-enter And Roll With The Paddle Float" for another variation of the solo paddle float recovery. After you are in the cockpit and upright you continue to pump and restow the equipment as mentioned above.
I pride myself in keeping an open mind when it comes to ideas, opinions, techniques and equipment. In most cases I can do a pro & con list in any category. This is especially true when it comes to equipment. The key to this recovery method is a reliable paddle float and a pump. I have seen and been involved with the changes in paddle float features over the years. If you are going to use an inflatable float consider the features that will give you the most advantage. There are many paddle floats on the market. Some good, some OK and some I would never want to use. Since I am so passionate about safety, recovery & rescue equipment you will hear my recommendations when I find products I really like and that have proven to work for me in real conditions.
For many years I have been very pleased with the GAIA "Big Swell" Inflatable paddle float. The easy draw cord attachment, two large chambers, mesh end to allow water drainage, quality of product and the one hand inflation valves provides me with a float that is easy and fast to use plus reliable. I give this product full USK Endorsement. If you cannot find it at your local kayak dealer visit the USK on line Store.
How long should it take to do this recovery? My response is, how well are you dressed for immersion? I like to challenge my students with the following: once you wet exit try to get out of the water onto your back deck in 60 seconds or less using the paddle float recovery method shown above. That includes inflation time. Remember your goal is to minimize your exposure to the elements.
I would be remiss if I didn't discuss the down side of this recovery method. You only have stability to one side during the recovery. See USK article, "Sea Wings Recoveries And Uses" for a recovery method that provides stability in both directions. You are very vulnerable when the float is deflating, being taken off of the blade and being restowed. Remember, you capsized in these conditions. Can you inflate the float in very cold conditions? Will your lips seal around the valves on a windy and cold day? (A great time to use a foam float) Have you regularly checked the integrity of the float and the air chambers to see if they work before you really need it? Is your paddle shaft strong enough for the recovery? As I mentioned earlier, there are pro's & con's to most aspects of kayaking.
Remember, the more self sufficient you are the more options you will have when conditions get rough. You need at least one solid reliable solo recovery (assuming a wet exit) in your recovery arsenal. Many folks have chosen the paddle float recovery as their primary one. As our USK motto states "do it in a way that works best for you."
Pictures seen above were taken from USK's video "Capsize Recoveries & Rescue Procedures".
© Copyright USK